Peraravatar+
Make a PNGTuber in your browser and export it for OBS
A tool built on the open-source Peraravatar with more features. Make your avatar in the browser, export it as a single HTML and use it in an OBS browser source. There are two ways to build: "Prepare each image" and "Build from one image". With "Build from one image", eye and mouth parts are layered on one base image to create blinking and lip sync. For lip sync, choose "By vowel", which changes the mouth shape with the vowels (a, i, u, e, o), or "By volume", which opens the mouth wider the louder you are. Decorations, custom expressions, and switching expressions with an OBS hotkey script or a dock (controller) are supported too.
* Peraravatar+ is built on the open-source Peraravatar with more features. Unlike the original, it downloads the finished avatar as a single HTML, so even if you are not confident with PCs, adding it to OBS is easy.
Unless you have a specific reason, we recommend Peraravatar+.
Getting started
Allow mic → choose how to build → choose how lip sync works → upload images → register vowels (if lip sync uses vowels) → adjust the motion → export as HTML → add to OBS
Mic
- Allow mic: starts using the mic. Pick the mic to use in the dropdown next to it (default:
Default mic) - The exported HTML looks for the mic chosen here by name (if not found, it uses the Windows default mic)
- Volume: the current volume. The marks are the thresholds
- Auto calibrate: measures silence and your speaking voice and sets the thresholds automatically
- Volume test: moves the volume by hand without the mic to check the lip sync (only with “By volume”)
- Register vowels: say a, i, u, e, o one at a time so it learns the vowels of your voice (register it if lip sync uses vowels)
- On the right, the mouth shown at the current volume (such as
Mouth: closed) and the current vowel (such asVowel: A) appear
Auto calibrate
- Measuring room noise: stay quiet and wait
- Measuring your voice: while the bar fills, keep talking in your usual streaming voice
- Results: the blue marks on the meter are the new values. If they look right, press “Apply”
It changes the lip sync stages, the loud reaction and each expression’s trigger volume together. Once done, the button becomes “Recalibrate”.
Register vowels
Say “ah”, “ee”, “oo”, “eh”, “oh” one at a time and hold each. “Registration results” shows how often your voice was recognized correctly; if it looks right, press “Apply”. Once done, the button becomes “Re-register vowels”.
Choose how to build
What differs is how blinking, lip sync and expressions are made.
| Method | Images to prepare |
|---|---|
| Prepare each image | Normal, blink, lip sync… one image each |
| Build from one image | One base image + eye and mouth parts |
With “Build from one image”, custom expressions can also be made by combining eye and mouth parts (a single image per expression works too). Decorations are available only with “Build from one image”.
How lip sync works
| Choice | Description |
|---|---|
| By vowel | Changes the mouth shape with the vowels (a, i, u, e, o). Whether the mouth opens is decided by volume. Before using it, register your voice with “Register vowels” under the meter (until then, the mouth moves with the “A” shape) |
| By volume | Opens the mouth wider the louder you are. Prepare a mouth image for each stage; each stage’s value (the lowest volume that shows that mouth) decides which one appears. “Auto calibrate” sets the stage values together |
“Lip sync” on the “Images” tab has these values with either method.
| Item | Description |
|---|---|
| Silence threshold | Volume below this value counts as silence and closes the mouth |
| Mouth interval (s) | After the mouth shape changes, it doesn’t change again for this long |
| Volume following (%) | Shown only with “By volume”. At 100 the stage follows the volume; at 0 a random stage shows while you talk |
With “By volume”, the value of stage 1 also serves as the “Silence threshold”. Below it, the mouth closes.
Prepare each image
Images to prepare
Recommended image specs:
- Size: 600 × 900 to 1080 × 1620px (portrait, 2:3)
- Format: PNG or WebP with a transparent background (JPEG and BMP can’t be transparent)
- PNG / JPEG / BMP are optimized automatically when imported
- “Position & size” adjusts the position and size of each image
Drop images all at once
If a file name contains one of these words (separated by underscores or hyphens), it goes into that slot automatically (not case-sensitive; if several match, rows higher in the table take priority).
| Slot | Words in the file name |
|---|---|
| Mouth “A” to “O” (by vowel) | mouth_a / mouth_i / mouth_u / mouth_e / mouth_o |
| Mouth stages 1–9 (by volume) | mouth1–mouth9 (mouth_1 and mouth-1 also work) |
| Mouth stage 1 (by volume) | mouth_o / mouth_u |
| Mouth stage 2 (by volume) | mouth_i / mouth_e |
| Mouth stage 3 (by volume) | mouth_a |
| Mouth, largest stage (by volume) | open (image with the mouth open) |
| Mouth “A” (by vowel) | open (image with the mouth open) |
| Blink (eyes closed) | blink / close / eye_closed / 瞬き / まばたき / 目閉 / 閉眼 |
| Look away (left) | left / 左 |
| Look away (right) | right / 右 |
| Normal | normal / default / base / idle / closed (image with the mouth closed) / 通常 |
| Custom expression | Anything that matches none of the above (the file name becomes the expression name) |
Buttons for each image
| Button | Action |
|---|---|
| Position & size | Adjust the image position |
| Clear | Return the image to unset |
| Preview | Stop the motion and show only that image |
Stop motion to check: press one of the buttons in the row (Normal, Blink (eyes closed), mouths, etc.) to stop the motion and show only that image. Press the selected button again, or “Exit preview” above the avatar, to release it.
Lip sync
- By vowel: the five mouths “A” to “O”
- By volume: Mouth stage 1 and up. Each stage’s value (
Volume ≥) is the lowest volume that shows that mouth (kept in ascending order). Put several images in one stage and one of them is picked. Add more with ”+ Add stage”
Build from one image
Base image
Eye and mouth parts are layered on this one image to create blinking and lip sync. It doesn’t work with a full-body image where the face is small (as a guide, the eyes should be at least 40px wide).
Drop base, look-away and expression images all at once
Layered parts (eyes, brows, mouth) can’t be added here. Put them in “Layered parts” below. A name with left / right / 左 / 右 becomes a look-away image (e.g. normal_left is Look away (left)).
| Slot | Words in the file name |
|---|---|
| Base image | normal / default / base / idle / closed (image with the mouth closed) / 通常 |
| Look away (left) | left / 左 |
| Look away (right) | right / 右 |
| Custom expression | Anything that matches none of the above (the file name becomes the expression name) |
Images named like mouth or close aren’t used with this method; they are kept as images for “Prepare each image”. Switch the method to “Prepare each image” and they are used as they are.
Base image type
| Type | Description |
|---|---|
| Blank face | Use an image with no eyes or mouth drawn |
| Eyes and mouth drawn in (*not recommended) | The drawn eyes and mouth are covered with the skin color, then the parts are layered on top. * Depending on the base image, they may not be hidden cleanly |
Eye and mouth positions
Check “Move brows separately” and the heading becomes “Eye, brow and mouth positions”, with Left brow and Right brow added.
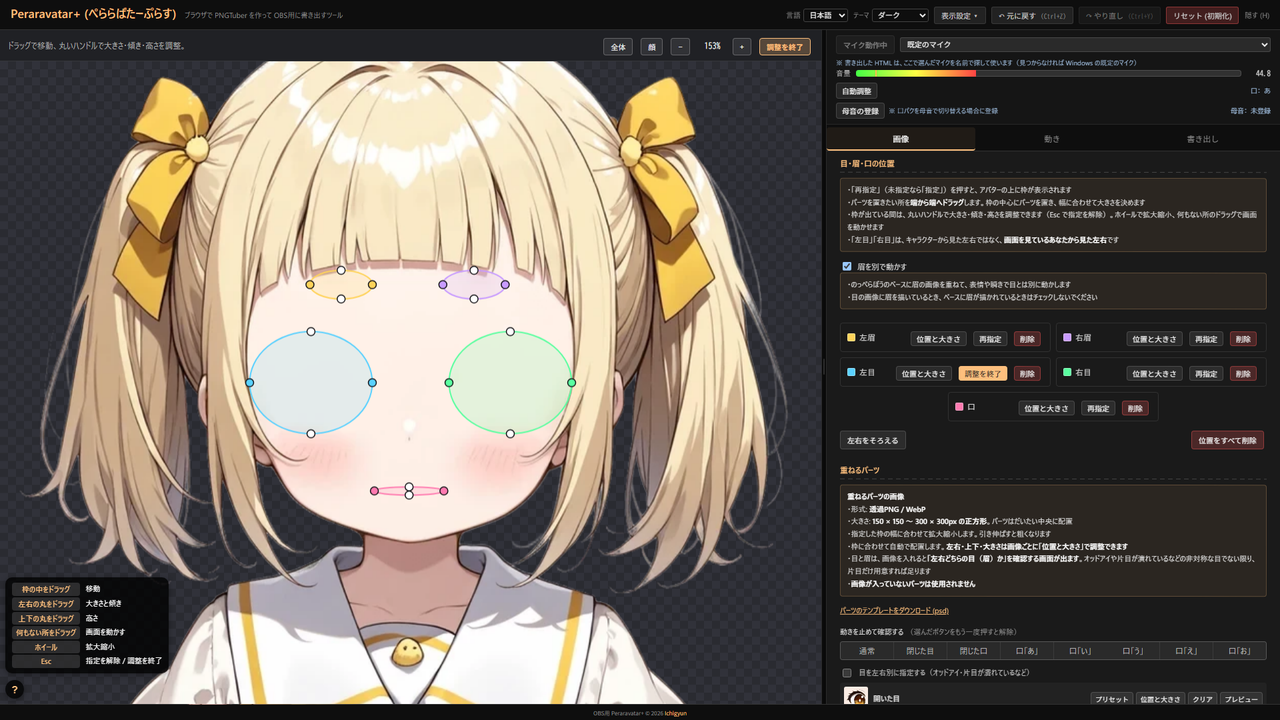
- Press “Set” and a frame appears over the avatar
- Drag from edge to edge where you want the part. The part is placed at the center of the frame and sized to its width
- While the frame is shown, the round handles adjust the size, tilt and height (Esc cancels the pick). Use the wheel to zoom and drag an empty area to pan the view
- When you’re done, press “Done” above the avatar or on that part’s button to close the editor
- “Left eye” and “Right eye” mean left and right as you see the screen, not from the character’s point of view
- “Fit”, “Face”, ”−” and ”+” above the editor change the zoom (“Face” zooms to the face)
Move brows separately
- Layer brow images on a blank-face base to move them separately from the eyes in expressions and blinks
- Leave it unchecked if your eye images include the brows, or if brows are drawn on the base
Left eye, Right eye, Mouth (plus Left brow and Right brow when moving brows separately)
- “Position & size” lets you fix
X (px)/Y (px)/Width (px)/Height (px)/Tilt (°)as numbers - “Delete” removes that position
- Make symmetric: makes the left and right eyes (and brows when moving them separately) symmetric. Size and height become the average of both sides, tilt is mirrored, and the left-right positions stay
- Delete all positions: removes all positions (part images and look-away settings stay)
Skin color for hiding the eyes and mouth
Shown when the base image type is “Eyes and mouth drawn in (*not recommended)”.
- The original eyes and mouth are filled with this color, then the part images are layered on top
- Choose skin that isn’t covered by hair or brows (press “Set” for “Skin color” and click on the image)
- Outside the frame, only areas close to this color are painted (brows and hair aren’t erased)
- Edge feather (px) blurs the painted edge
Layered parts
Images for layered parts
- Format: transparent PNG / WebP
- Size: a square from 150 × 150 to 300 × 300px, with the part roughly centered
- Scaled to the width of the frame you set. Stretching makes them rough
- Placed automatically to fit the frame. Left-right, up-down and size can be adjusted per image with “Position & size”
- For eyes and brows, a screen asks whether the image is the left or right one when you add it. Unless the eyes are asymmetric (odd eyes, one eye closed, etc.), one eye is enough
“Download parts template (psd)” under the “Images for layered parts” notes downloads a PSD file (a 300 × 300 square) for drawing layered part images.
| Item | Description |
|---|---|
| Set the eyes separately (odd eyes, one eye closed, etc.) | When checked, the eyes split into “The eye on your left” and “The eye on your right” |
| Open eyes | An image for one eye, used for both. With “Eyes and mouth drawn in (*not recommended)”, the base image is used as is if left empty |
| Half-open | Added with ”+ Add eye image”. An image for one eye, used for both |
| Closed eyes | An image for one eye, used for both |
| Brows | Shown only with “Move brows separately”. An image for one brow, used for both |
| Blink brow drop (%) | Shown only with “Move brows separately” |
| Closed mouth | The image while the mouth is closed |
| Mouth “A” to “O” | A mouth image for each vowel (a, i, u, e, o) |
| Item | Description |
|---|---|
| Set the eyes separately (odd eyes, one eye closed, etc.) | When checked, the eyes split into “The eye on your left” and “The eye on your right” |
| Open eyes | An image for one eye, used for both. With “Eyes and mouth drawn in (*not recommended)”, the base image is used as is if left empty |
| Half-open | Added with ”+ Add eye image”. An image for one eye, used for both |
| Closed eyes | An image for one eye, used for both |
| Brows | Shown only with “Move brows separately”. An image for one brow, used for both |
| Blink brow drop (%) | Shown only with “Move brows separately” |
| Closed mouth | The image while the mouth is closed |
| Mouth stage 1 and up | A mouth image for each volume level. Added with ”+ Add mouth image” |
Buttons for each part
| Button | Action |
|---|---|
| Presets | Pick from the default presets. For half-open, “Squash the open eyes” squashes the open eyes into half-open ones |
| Position & size | Adjust the image position |
| Clear | Return the image to unset |
| Preview | Stop the motion and show only that image |
Stop motion to check: press one of the buttons in the row (Normal, Closed eyes, Closed mouth, mouths, etc.) to stop the motion and show only that image. Press the selected button again, or “Exit preview” above the avatar, to release it.
Delete all layered parts: removes all layered part images (eye and mouth positions stay).
Lip sync
| Item | Description |
|---|---|
Mouth stage 1 and up (Volume ≥) | Shown only with “By volume”. Sets the volume at which each mouth image above appears |
Look away
Set it up if you need it. Check “Look away (left)” and “Look away (right)” to use them. “Preview” is at the top right of the card.
“Method” chooses between combining parts and using a single image.
| Item | Options |
|---|---|
| Eyes | As is / Add eyes |
| Left eye / Right eye (Add eyes) | Add the left and right eyes (as you see them) separately so the pupils point the same way |
| Mouth | As is / Add mouth |
The added eye and mouth images have “Presets”, “Position & size” and “Clear”.
| Item | Description |
|---|---|
| Image | Click or drop the look-away image into the box on the left of the card |
Once an image is in, “Position & size” and “Clear” appear at the top right of the card.
Decorations
Available with “Build from one image”.
- Layer images such as glasses, cat ears or hair clips anywhere you like (up to 8. Format: transparent PNG / WebP)
- An image the same size as the base image is placed exactly where it was drawn
- Prepare the “Swap image” at the same size as that decoration’s image
- Items lower in the list are drawn in front (“Up” / “Down” to reorder)
Placement
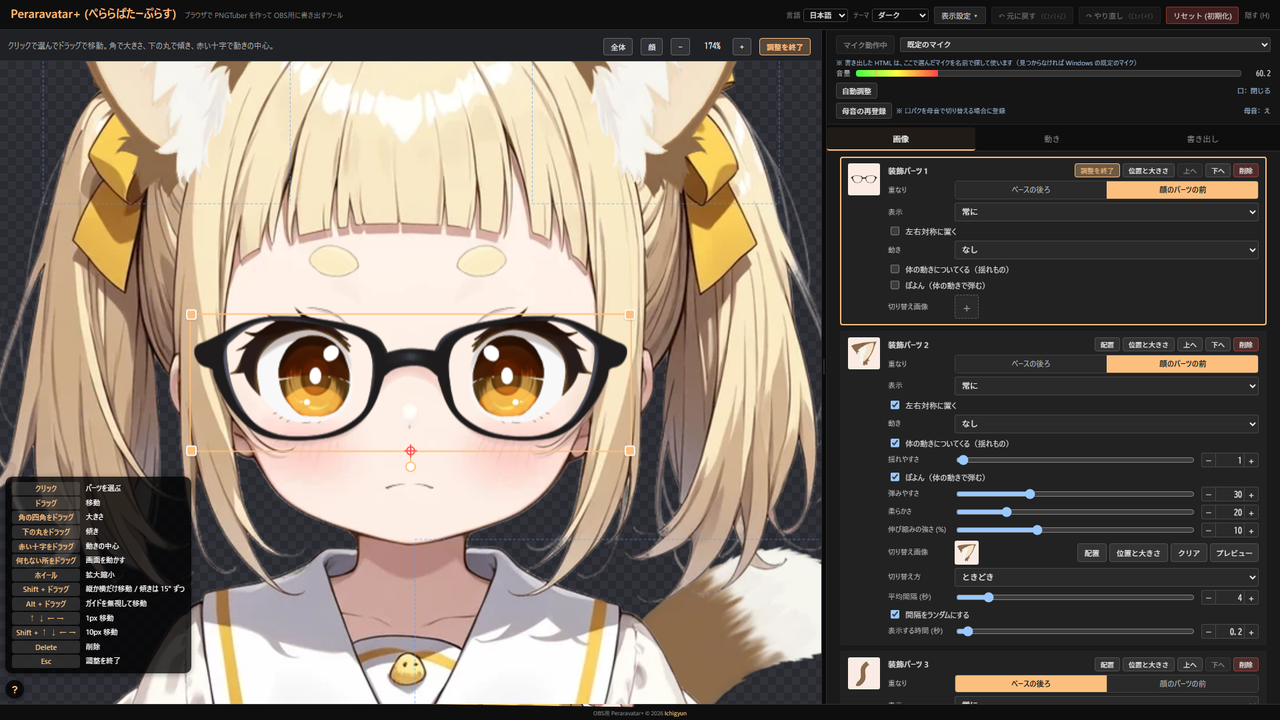
Add one with ”+ Add decoration” or press “Place” to move it directly on the avatar.
| Control | Action |
|---|---|
| Click | Select a part |
| Drag | Move. Near the face center line, the eye height or another part’s center, a pink guide line appears and it lines up with it |
| Drag a corner square | Size (keeps the aspect ratio) |
| Drag the bottom circle | Tilt |
| Drag the red cross | Center of motion (the axis for swinging and spinning) |
Shift + drag | Move only vertically or horizontally / tilt in 15° steps |
Alt + drag | Move ignoring guides |
↑ ↓ ← → | Move 1px |
Shift + ↑ ↓ ← → | Move 10px |
Delete | Delete the selected part |
Esc | Done |
When you’re done, press “Done” above the avatar or on that part’s button to close the editor.
Card items
| Item | Description |
|---|---|
| Layer | Behind the base / In front of face parts |
| Show | Always / While a chosen custom expression shows. With “While a chosen custom expression shows”, it appears only during the checked custom expressions (e.g. show 💢 only with an angry expression) |
| Mirror to the other side | Places a copy at the mirrored position |
| Position & size | X (px) / Y (px) / Size (×) / Tilt (°) |
| Motion | Motion table |
| Follow body motion (physics) | Swing sensitivity |
| Squish (bounces with body motion) | Bounciness / Softness / Squash (%) |
| Swap image | ”Place”, “Position & size”, “Clear”, “Preview” |
| Swap timing | Off / Now and then (Avg. interval (s), Random intervals, Show for (s)) / While talking / While a chosen custom expression shows (Custom expression) |
Motion
| Motion | How it moves | Values |
|---|---|---|
| None | Doesn’t move | |
| Wobble | Sways left and right around the center of motion | Swing (°) / Period (s) / Random period |
| Wiggle (bends as it sways) | Bends more toward the tip, with the center of motion as the root (tails, etc.) | Swing (°) / Period (s) / Random period |
| Twitch (now and then) | Twitches now and then | Swing (°) / Interval (s) / Random intervals |
| Sway with your voice | Sways more the louder your voice | Swing (°) / Period (s) / Random period |
| Wag (while talking) | Wags only while you talk | Swing (°) / Period (s) / Random period |
| Twitch (when a chosen custom expression starts) | Twitches when one of the checked custom expressions starts | Swing (°) / Custom expression |
| Twitch (on blink) | Twitches on each blink | Swing (°) |
| Float (bob up and down) | Slowly bobs up and down | Up-down range (px) / Period (s) / Random period |
| Bounce (light hops) | Hops up and comes back down, over and over | Up-down range (px) / Period (s) / Random period |
| Shake (small tremble) | Jitters slightly up, down and sideways | Range (px) |
| Pulse (size throbs) | Its size throbs around the center of motion | Size range (%) / Period (s) / Random period |
| Spin (keeps turning) | Keeps turning around the center of motion | Time per turn (s) / Reverse |
The options that depend on “a chosen custom expression” can’t be selected unless there is a custom expression with an image or parts.
“Delete all decorations” removes them all.
Custom expressions
Assign any expression you like, such as smiling, crying or angry. Add one with ”+ Add expression”.
- Press the key button, then press the key you want (Backspace for no key, Esc to cancel). H (show / hide the menu) and Y (look away) can’t be assigned
- Keys assigned here are separate from OBS hotkeys
By default, Surprised (Z, Recoil (pull back)) / Happy (X, Bounce (light hops)) / Crying (C, Shake (small tremble)) are included.
Card items
| Item | Options |
|---|---|
| Action (right of the key button) | None / Hop (jump up) / Recoil (pull back) / Shake (small tremble) / Bounce (light hops) / Wobble (sway side to side) / Nod (up and down) / Head shake (side to side) |
| Hold | Only while held / Until pressed again / For a set time (Show for (s)) |
| Trigger by volume | Don’t trigger / Once when it crosses (1 s) / While above the threshold |
| Trigger volume | Triggers when the volume goes above this value |
| Voice pattern | ”🎤 Add recording” records a voice pattern. You can record several; any match triggers it |
| Match strictness | Shown only after recording a voice pattern. The higher the value, the closer the match must be to trigger |
“Preview” and “Delete” are at the top right of the card. Fine-tune each action under “Expression switching and actions” on the Motion tab.
Method
With “Build from one image”, “Method” chooses between combining parts and using a single image. With “Prepare each image”, it’s a single image only.
| Item | Options |
|---|---|
| Eyes | As is / Reshape eyes / Add eyes |
| Style (Reshape eyes) | Wide open (surprised) / Narrow (sleepy), Amount |
| Brows (Move brows separately) | As is / Reshape brows / Add brows |
| Style (Reshape brows) | Raise / Lower / Worried brows / Angry brows, Amount |
| Mouth | As is / Add mouth |
The added eye, brow and mouth images have “Presets”, “Position & size” and “Clear”.
| Item | Description |
|---|---|
| Image | Click or drop the expression image into the box on the left of the card |
- Once an image is in, “Position & size” and “Clear” appear at the top right of the card
- While a single-image expression is shown, lip sync and blinking stop
Motion tab
Motion for the whole avatar. Decoration motion is set on each part in the “Images” tab.
| Heading | Items |
|---|---|
| Breathing / sway | Breathing height (px) / Breathing period (s) / Sway range (px) / Sway period (s) |
| Squish | Off / Each time you talk / The whole time you talk / With volume Squash (%) / Hop height (px) / Softness |
| Blink | Min interval (s) / Max interval (s) / Eyes closed for (s) |
| Head tilt while talking | Max angle (°) / Change interval (s) / Follow speed |
| Idle gaze drift | Sideways range (px) / Period (s) / After silence (s) |
| Loud reaction (quick zoom) | Trigger volume / Zoom strength (%) |
| Look away | Min interval (s) / Max interval (s) / Show for (s) / Head tilt angle (°) |
| Sleepy mode | Sleepy after (s) / Fully asleep after (s) / Breathing depth (×) |
| Expression switching and actions | Switch fade (s) Fine-tuning for the actions chosen on each custom expression card: Hop / recoil / Shake / Bounce / Wobble / Nod / Head shake |
- Squish: the avatar squashes, stretches and bounces like mochi when you talk
- Loud reaction: when you shout, the avatar briefly zooms in. Its trigger volume is also used by Squish and the decoration motion that sways with your voice
- Look away: while you’re quiet, the avatar looks away now and then. Press the Y key to look away at any time
- Sleepy mode: if silence continues, blinks get longer until the eyes stay closed
- Expression switching and actions: switching to an expression or look away fades briefly from the previous image (0 switches instantly)
Export tab
Export HTML
- Export avatar as HTML: exports the current state as a single HTML (
peraravatar-plus-avatar.html). Settings can’t be adjusted inside the exported HTML. For adding it to OBS, see Adding to OBS - Keep the background in the export: the exported HTML has a transparent background. Check this to export with the background chosen in “Display” in the header (for example, to export a solid color and key it out in OBS)
- If there is something to check before exporting (vowels not registered, sample images in use, expressions with no key, etc.), a confirmation appears. To ignore it, export with “Export anyway”
Switch expressions while streaming
Export OBS hotkey script: saves a script (peraravatar-plus-hotkeys.lua) that switches expressions with OBS hotkeys. For how to use it, see Switch expressions while streaming
Transfer & backup
Save your settings to a file to move them to another device or in case your browser data is lost.
- Export JSON file: saves
peraravatar-plus-config.json. It includes everything, even what isn’t shown on screen, such as the images and settings of the method you aren’t using - Load JSON / HTML file: loads a saved JSON or an exported avatar HTML. Your current settings and images are replaced with the file’s contents. Loading from HTML restores only the images and settings of the method used when it was exported
URL parameters
Add these to the end of the URL of the exported HTML.
| Parameter | Description |
|---|---|
?custom=z | Always show the expression assigned to the Z key (Surprised by default) |
?custom=Happy | You can also use the expression name |
?controller | Switch with buttons |
Adding to OBS
-
Export the HTML: “Export avatar as HTML” on the “Export” tab
-
OBS launch flag: to use the mic, OBS needs the launch flag
--use-fake-ui-for-media-stream. Right-click the OBS shortcut (desktop, etc.) → Properties → edit “Target” like this."C:\Program Files\obs-studio\bin\64bit\obs64.exe" --use-fake-ui-for-media-stream --autoplay-policy=no-user-gesture-required
If “Start in” is empty, set it to
C:\Program Files\obs-studio\bin\64bit. Without this flag, the browser source can’t get mic permission. -
Add a “Browser” source: leave “Local file” unchecked and put the location of the exported HTML in the URL field (checking it disables the mic)
-
How to write the URL: not as
C:\Users\…\peraravatar-plus-avatar.html, but withfile:///in front and\turned into/:file:///C:/Users/…/peraravatar-plus-avatar.html -
Size: set the OBS browser source to the same aspect ratio as the avatar to fit it with no margins (the “Export” tab shows the current image size). If decorations move beyond the base image, transparent margins are added to the sides and top to cover their range of motion
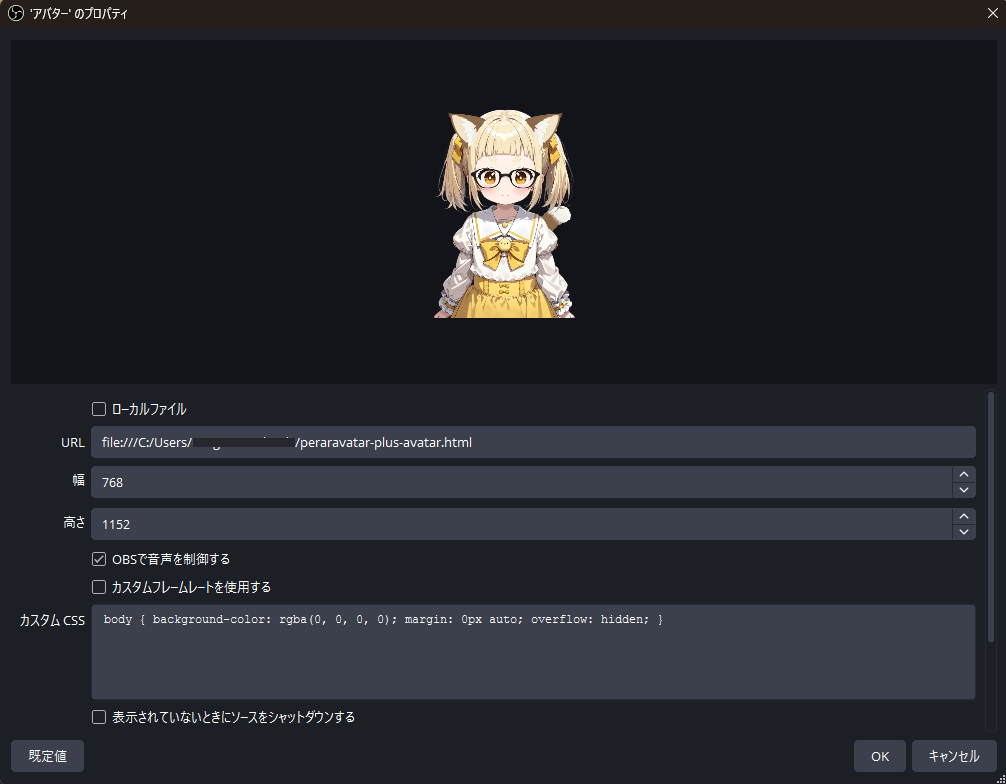
The mic chosen in the editor is looked up by name (if not found, the Windows default mic is used).
Switch expressions while streaming
An OBS browser source doesn’t receive keyboard input, so switch expressions in one of these ways.
Switch even during games
- Save
peraravatar-plus-hotkeys.luawith “Export OBS hotkey script” on the “Export” tab - Add it in OBS “Tools → Scripts” and an item for each expression appears in “Settings → Hotkeys”. The assigned keys work even when OBS isn’t focused
- By default,
Ctrl+Shift+1–8are expressions,Ctrl+Shift+9is look away andCtrl+Shift+0clears the expression (change them in “Settings → Hotkeys”)
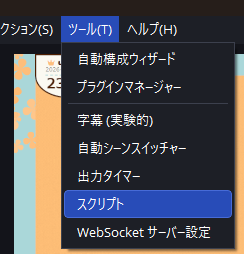
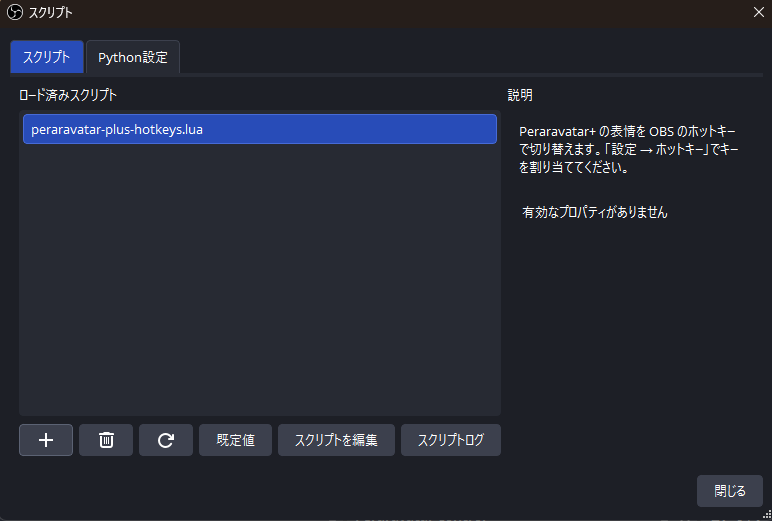
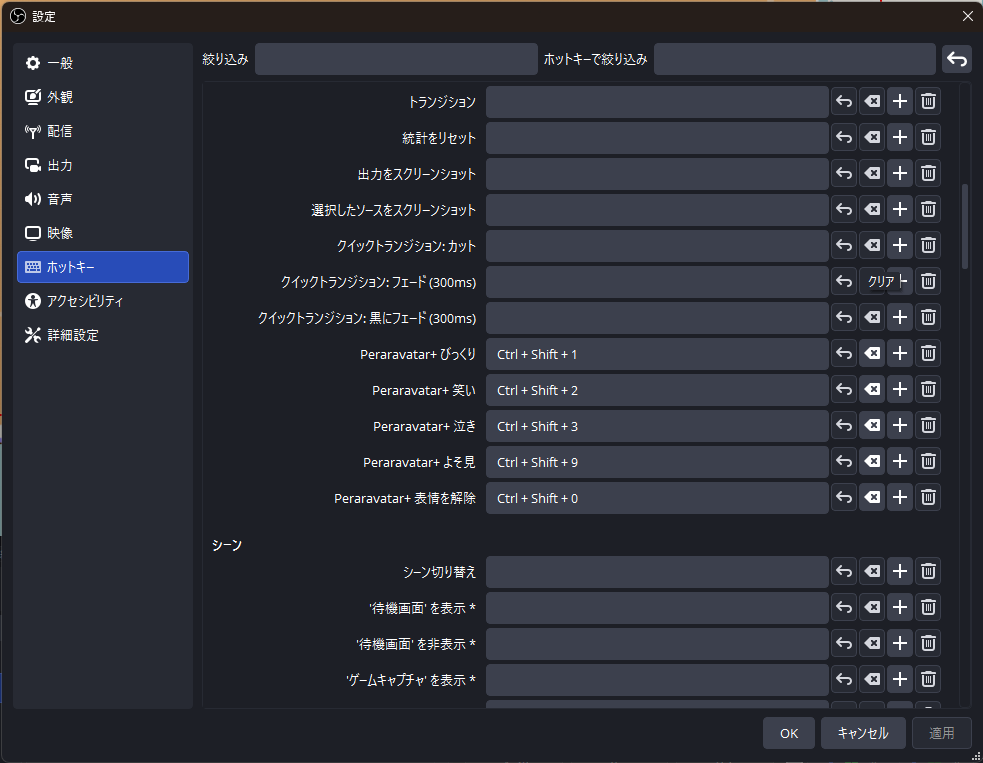
After adding, removing or renaming custom expressions, peraravatar-plus-hotkeys.lua needs updating too. Export it again, overwrite the old peraravatar-plus-hotkeys.lua and reload it in “Tools → Scripts” (assigned keys are kept).
Switch with buttons
In OBS “Docks → Custom Browser Docks”, add the browser source URL with ?controller at the end to get a panel of expression buttons (Peraravatar+ Controller).
file:///C:/Users/…/peraravatar-plus-avatar.html?controller
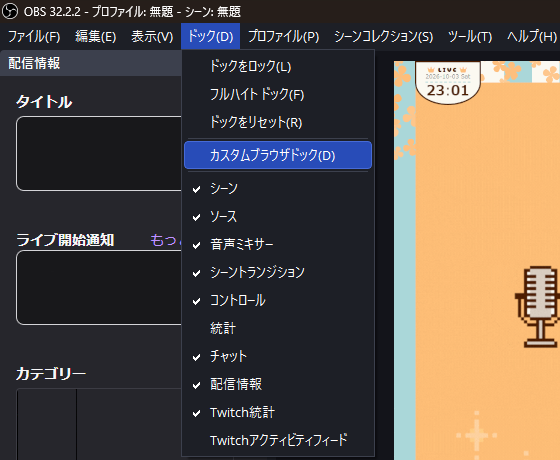
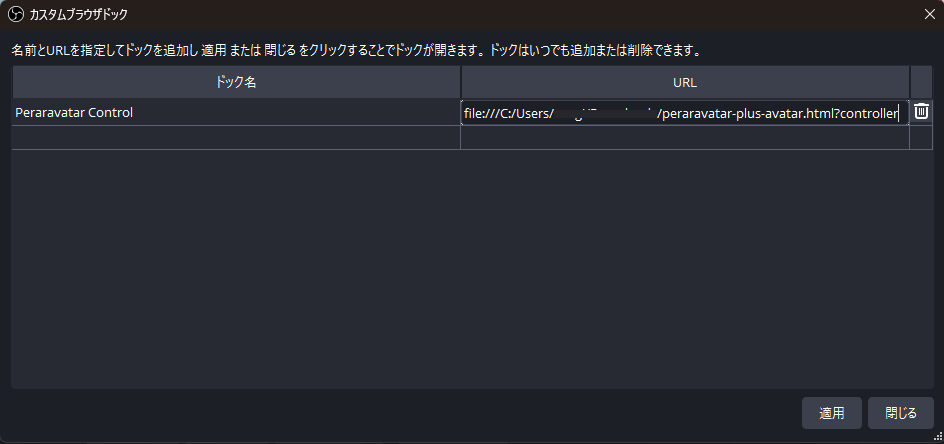
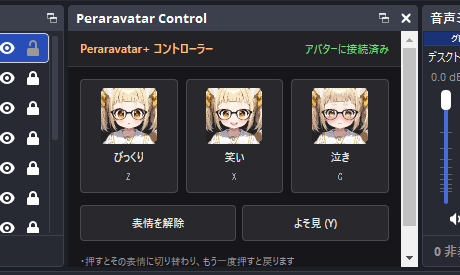
The controller dock can be placed anywhere, just like any other dock.
- Press a button to switch to that expression; press it again to go back
- There are also “Clear expression” and “Look away (Y)” buttons
- You can also click anywhere in the dock and press the keys shown on the buttons
- If
Connected to the avatardoesn’t appear at the top right, the setup isn’t working - Opening it in a browser doesn’t reach the avatar in OBS. Use it from the OBS dock
If you close the controller dock by mistake, it is listed at the bottom of the “Docks” menu, so open it from there.
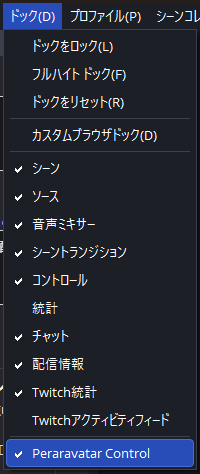
Language / view settings
Everything below is switched from the header and persisted in localStorage:
- Language: 日本語 / English — the UI text. The exported avatar HTML, the controller and the OBS script use the language at the time of export
- Theme: Dark / Light / Fancy / Handcraft — the editor colors only (the avatar is unaffected)
- Display: under “Menu”, Text size (90% / 100% / 110% / 125% / 150%) / Menu position (Right / Left); under “Background (for checking transparency)”, Background type (Transparent (for OBS) / Checkerboard / Solid color) / Background color
Data storage
- Settings and images are saved in the browser automatically
- ↶ Undo / ↷ Redo:
Ctrl+Z/Ctrl+Y - Reset (initialize): returns all settings (including images) to the defaults of the current method. Registered vowels and the mic choice are kept
- For backups, see Transfer & backup
Shortcuts
| Key | Action |
|---|---|
| Keys assigned to custom expressions | That expression |
H | Show / hide the menu |
Y | Look away |
Ctrl+Z / Ctrl+Y | Undo / Redo |
Esc | Cancel the pick, Done, or show the hidden menu and header |
For shortcuts while placing decorations, see Decorations.
Credit
Crediting the tool in your streams or personal projects is not required, but it is always encouraging.
Standard format
Peraravatar+ by Ichigyun
https://gyungyun.com/en/works/peraravatar-plus
Short format
Avatar: Peraravatar+ (gyungyun.com) / @zkmy_kuro
See the credit policy on the top page for the general guide.