Setting up AI image generation on your own PC
7 min read
I ended up needing to generate images with AI, so I set up ComfyUI. People keep asking me how I do it, so here are the steps. Running it on your own machine means no image quota and no monthly fee — with a GPU in the box you can generate as much as you like.
What you need
- A PC with an NVIDIA graphics card. As a rough guide, one that runs recent open-world games reasonably well
- Disk space. A few GB for the app itself, plus about 6.5GB per model. Leave 50GB free
- Windows 10 / 11
Graphics card performance is measured as VRAM. 8GB is enough to start, but 12GB or more keeps resolution and batch size from becoming a problem. Open the Performance tab in Task Manager and look at the GPU section — the figure listed as “Dedicated GPU memory” is it.
Installing
This note was written against these versions.
- Desktop app: Comfy Desktop 1.0.46 (ComfyUI 0.34.2)
- CLI: ComfyUI 0.34.0
There are several ways to install ComfyUI; this note covers two. Whichever you pick, the screen you get afterwards and the way you use it are much the same.
Desktop app (recommended): download the installer and run it. This is what the project itself recommends. Unless you have a reason not to, pick this one.
CLI: you type commands into a terminal. It suits you if:
- you want to control where it goes and which version you run
- you want to hand image generation work to a terminal-based AI such as Claude Code or Codex
The official CLI is built with coding agents in mind, so if that is your plan, start here.
Desktop app
- Download the installer from comfy.org/download
- Run it and follow the installer
- Picking one at “Choose a starter workflow” downloads the models it needs automatically
CLI
Open the official page, comfy.org/cli. We are installing on our own PC from the command line, so pick Comfy CLI and Local ComfyUI.
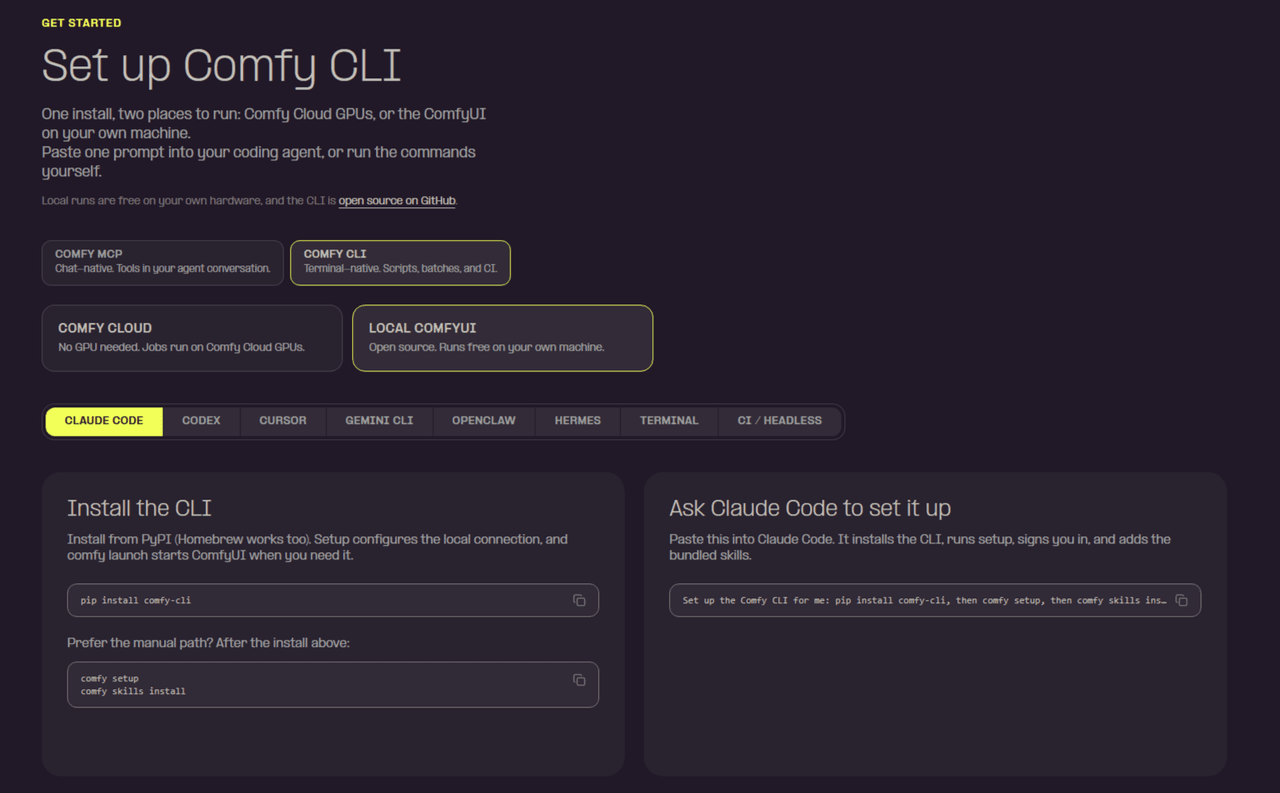
Choosing the AI you use from the tabs below shows a prompt that finishes the setup once you paste it in. If you are handing the job to an AI, that is the quick way.
Here is the route where you type the commands yourself.
You need Python. If you do not have it, run this in a terminal.
winget install —id Python.Python.3.12 —exact
Install the CLI.
pip install comfy-cli
Set it up.
comfy setup
It is interactive, so answer the questions as they come.
Start it.
comfy launch
ComfyUI opens in your browser. From then on this one command starts it.
The commands do change, so if something does not work, check the official page.
The screen
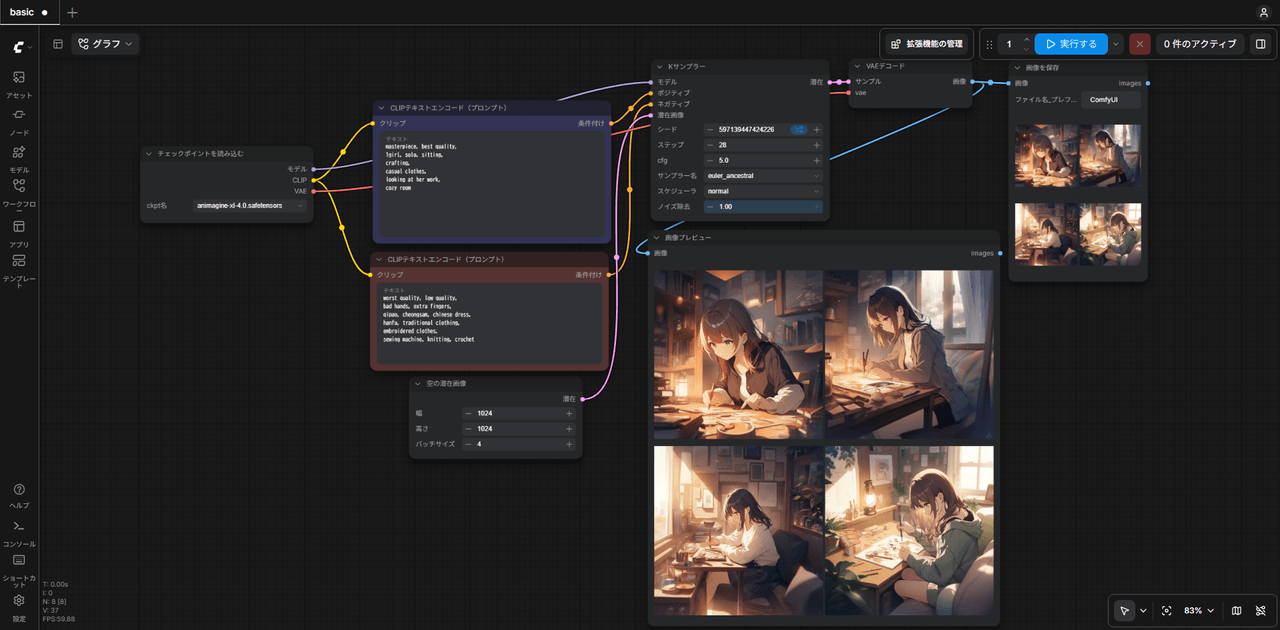
ComfyUI is a screen where you wire boxes (nodes) together with lines to build up a pipeline.
The screen at startup
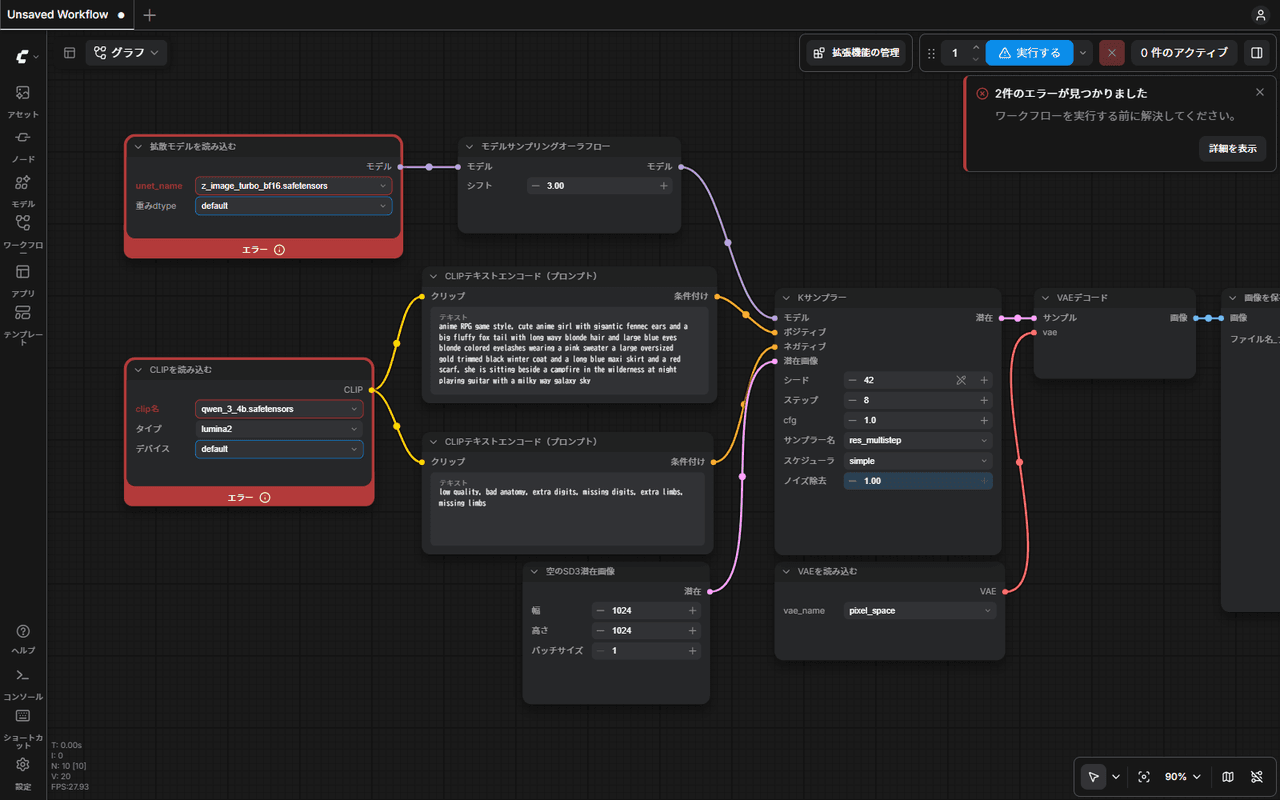
You may get an empty canvas, or a default workflow already on it. Either way, open Templates in the left menu and pick SDXL1.0: Text to Image (Simple).
The left menu
Icons run down the left edge of the screen. Click one and a panel opens beside it; click again and it closes.
| Item | What it is |
|---|---|
| Assets | Where generated files and uploaded files live. Split into generated and imported |
| Nodes | The list of nodes you can place. Find one here and add it to the canvas |
| Models | The models you have, listed per folder such as checkpoints and loras |
| Workflows | The workflows you have saved |
| Apps | A workflow reduced to input fields and results. Hand it to someone without showing the nodes |
| Templates | Sample workflows. Pick one and it opens already wired |
The two you use first are Templates and Models.
The basic shape
The simplest text-to-image arrangement.
load the model --+-- positive prompt --+
                 |                     |
                 +-- negative prompt --+-- generate -> to image -> save
                 |                     |
                 +-- image size -------+
In actual node names:
| Node | What it does |
|---|---|
| Load Checkpoint | Picks the model to use |
| CLIP Text Encode (Prompt) | Where the positive and negative prompts go (there are two of them) |
| Empty Latent Image | Sets the image size and how many to make |
| KSampler | Does the generating |
| VAE Decode | Turns the result into an image |
| Save Image | Writes it to the output folder |
Load Checkpoint has three outputs, going to KSampler, CLIP Text Encode (Prompt) and VAE Decode. This shape never changes, so leave the wiring alone at first and change only the text and the numbers.
Where the output goes
After VAE Decode you wire either Preview Image or Save Image. Preview Image just shows the result on the spot; Save Image writes it out to the output folder automatically. The template ships with Save Image.
Which one you want depends on how you handle what you generate. Preview Image if you save only the ones you like, by hand; Save Image if you keep everything and pick through it later. You can also wire both.
Preparing a model
ComfyUI on its own cannot produce anything. You need a model — a trained file of several GB. The art style comes from the model.
How to add one
Open a workflow whose models you do not have and an error appears at the top right of the screen. Press View details and the side panel lists the missing models with a download button.
The desktop app starts downloading right away, and progress shows on the download icon at the top right. The CLI install asks you where to put them.
If you already have models
In the desktop app, Menu → Desktop Settings → Storage → Add Shared Directory adds the whole folder. It needs a Relaunch afterwards.
To drop files in directly, the desktop app uses %LOCALAPPDATA%\Comfy-Desktop\ComfyUI-Shared\models\checkpoints and the CLI install uses ComfyUI\models\checkpoints. After adding a file, press r in the ComfyUI screen and it is picked up.
Which model to pick
If you plan to distribute or sell what you generate, checking the license is not optional. “May I redistribute the model” and “may I use the images commercially” are separate conditions, and conflating them is how people get burned.
| Model | Style | License | Commercial use of images | Notes |
|---|---|---|---|---|
| Animagine XL 4.0 | Anime | CreativeML Open RAIL++-M | Yes | States that it adds no extra restrictions |
| Illustrious-XL v1.0 | Illustration | Same | Yes | |
| SDXL base 1.0 | General | Same | Yes | The plain base model |
| RealVisXL V5.0 | Photoreal | Same | Yes | |
| Juggernaut XL v9 | Photoreal | CreativeML Open RAIL-M | Yes | |
| NoobAI-XL 1.1 | Illustration | FAIPL 1.0-SD | Yes | Derived models cannot be kept private |
| Pony Diffusion V6 XL | Illustration | Civitai settings | Conditional | Credit is required |
| FLUX.1 [schnell] | General, high quality | Apache 2.0 | Yes | Requires an account to download |
| FLUX.1 [dev] | General, high quality | Non-commercial license | No | Fine for personal use |
If you are unsure, starting with Animagine XL 4.0 (anime) or RealVisXL V5.0 (photoreal) is a safe bet. The terms are permissive and both are easy to get results from.
Watch out for FLUX: despite the shared name, schnell allows commercial use and dev does not — the exact opposite of each other.
Generating an image
What to change first
- Pick your model under
ckpt_namein Load Checkpoint - Write the positive prompt in the upper CLIP Text Encode (Prompt)
- Write the negative prompt in the lower CLIP Text Encode (Prompt) (
worst quality, low quality, bad anatomyis a reasonable start) - Click Run
Anime models are trained on tags rather than sentences, so write the prompt as a comma-separated list like 1girl, blue hair, smile.
Settings to start from
The KSampler and Empty Latent Image values. The template ships with these.
| Setting | Value | What it does |
|---|---|---|
| steps | 25 | How many passes it paints. More takes longer |
| cfg | 7 | How strictly it follows the prompt. Too high and the image breaks up |
| sampler_name | dpmpp_2m | The generation method |
| scheduler | karras | Same |
| width / height | 1024 × 1024 | SDXL models are stable with a long edge around 1024 |
Drop to something small like 512 × 512 and it falls apart immediately.
Summary
- If you get stuck, ask an AI 🫵
- Adult image generation is in the next note18+ 🤐 18+ hidden
Contact
Bug reports & Feature requests
Use the form for "it doesn't work" or "I wish it could…". Easiest channel for me to triage.
Contact form ▶
Business & Other inquiries
For work requests and other inquiries, please email me.
Email ▶
Feedback & Cheers
An anonymous one-liner channel. Even just "I'm using it" makes me happy.
Marshmallow ▶